
Three Quests for Curses
A Powers & Perils Adventure
For 5-7 lower level characters (CDF's of about 3-5 each is suggested). No law oriented characters should be allowed to participate in this adventure. No one capable of lifting curses is allowed to participate in this adventure (this includes magical equipment they might have in their possession that can lift curses). It is suggested that the party is composed of one assassin, one thief, one magic user, and at least two fighters.
Special Notes
(P) The Three Quests for Curses adventure is divided into six "adventure" sections. Many other sub-sections also appear. To clarify which portions are to be read by the players AND the ref and those that are to be read ONLY by the ref I have devised the following system. If the part is to be read by anyone it is prefaced with a (P) sign. If the section is to be read ONLY by the ref it is prefaced with an (R) sign instead. For an example of this see the (P) sign at the beginning of this paragraph.
Backgrounds of the Main Characters
(R) All of the following portions detail the extensive backgrounds for the main foes encountered in this adventure and is completely for the ref's eyes only UNLESS he deems it otherwise appropriate.
The History of Seroth the Wizard
Seroth was born in the 1065 SA in the Rogizini Empire. He was ridiculed by all the other children of the village where he lived, due to his strange behaviors. After a few years of this abuse he lost his temper and sought vengeance on all those that ridiculed him. Soon a nearby Heliophobic Demon heard of Seroth's search for vengeance and so this demon came to Seroth and offered his assistance. Seroth told the demon that he would do most anything to gain his vengeance. In answer the demon told Seroth that he should travel south to the Windword Caves and seek out the evil wizard who lives there. After Seroth learned and completed his apprenticeship with the evil wizard he could return as a powerful magic user and punish those who had hurt him. When all this was said, Seroth agreed to go and the demon disappeared into the night.
The next day Seroth traveled south to the caves and was taught the dark arts. After eight years he completed his apprenticeship and more, surpassing the evil wizard in his skills. Seroth returned to his village during the night and created curses/plagues/and diseases on all those that he disliked. In the morning he was gone. He left the village to travel southwest to reach the dark city of K'lza'babwe. It is well known that anything and everything that is evil flourishes in K'lza'babwe. While Seroth resided there he went on many adventures (for evil causes, of course) and his fame grew. He soon had a small following of evil warriors and decided to travel 10 miles north of K'lza'babwe where he built a small castle just outside the city limits and Seroth prospered. He continued to add to this riches, he went out on more adventures, and improved his magic. He began to build his own private army and eventually hired a WHOLE assassins guild for private purposes. His forte' was trickery.
Seroth loved to trick people and gained many enemies in this manner. Once he tricked a prince into killing 20 of the prince's own hirelings and then Seroth killed the prince when his guard was low. But obviously no one ever provided proof-positive as to who the prince's killer had been, or Seroth (mighty as he is) would be dead.
Soon Seroth became bored and yearned for excitement. He became an avid reader of books telling of past evil and magic. From his readings he learned of Decapath (Demi-god of Destruction and son of Abaddon). Decapath was described in entirety in a specific historical tome on Chaos magic. The book stated there was only ONE way to control Decapath and Seroth decided he should set out to achieve it .. .
The History of Gorgith the Gorgon
Gortith was a beautiful maiden born in the year 1074 SA in the country of Shurikal. From the day of her birth she was raised to be sacrificed to the god Kototh as had been the practice of her people. On the coming of her 16th birthday she was brought to the Shrine of Gorgons for the traditional ritual that occurred whenever the former Medusa of the shrine died. She willingly became cursed by her god Kototh so as to replace the former Medusa as the Guardian of the Shrine and Voice of Kototh. Two sightless Gorgons are her servants and she lives in the style of a queen because her people give her gifts and wealth beyond compare. But be assured that many thieves and warriors have sought to take those treasures from the shrine and the many statues that decorate the landscape are all evidence to this. Gorgith is also the guardian of the statue of Decapath (which sits on the shrine itself.)
The History of Scallick the Mushrussu
Scallick's age and birth date are unknown but it is guessed that he is over two hundered years old and his birth date is said to have been in the year 885 SA. He grew up among the Ahura and became one of their favored pets. Soon, when he became of age, he was made guardian of the Temple of Prezivor (when the old guardian died). Scallick guards the Eye of Decapath (a jewel which appears whenever Decapath is defeated).
The History of Idumoon the Wizard
Idumoon was born in the year 1040 SA in the country of Ma'Helas where the forces of Balance reside much of the time (as do many Sidh creatures; Elder, and sometimes Law and Chaos). Ma'Helas was an uncertain country during his childhood and for much of his adulthood. The forces of Balance seemed unable to enforce their rule over the land and it became a battle field between Law and Chaos, who strived to destroy each other and Balance. So Balance held on by the skin of their teeth until, finally, a great wizard (Idumoon) took it upon himself to use his magic to save the troubled country. With the help of some fellow wizards, they all but banned the quarreling Law and Chaos forms from their land. After this common goal was accomplished, however, the Balance wizards (as usual) split up and went their separate ways. Idumoon traveled toward the northeastern part of the country of Ma'Helas and built a tall tower. He now spends all of his days studying magic and awaiting the next day that his powers will be called upon for Balance. Idumoon knows of Decapath and the powers of Decapath. Idumoon has found and now guards the Tome of Decapath, knowing that some day an evil person will come in search of it for the great power it holds.
The History of Decapath the Demi-God of Destruction
It is said by the priests of Abaddon that Decapath was born when the humans first drew their collective breath and the sun first set. He was sired by Abaddon and Dorshath (the first Wyrm ever to live) and was deprived of all intelligence. Decapath lived ONLY to destroy and that is what he did. He leveled three castles of the Elves and four cities of the Dwarves. Likewise Goblins, Ahuras and many others suffered at his hands. Finally a combined effort by the Ahura kind, Elves, Dwarves and Giants stopped the threat to all life. A threat to all except Chaos, who had smiled at their new found power. The combine defeated Decapath through magic, strength and will. When the final blow was struck by Torl (one of the mightiest Mountain Giants of all times) Decapath let out a hideous scream and a strange thing happened. Instead of death, his body took on a different form. His physical body grew smaller and smaller until it became encased in stone, giving him the appearance of a statue. Decapath's strength was lost and his single eye turned into a huge flawless red ruby and dropped to the ground. From that point on the participating races (or combine) swore that they would protect the items that could release the Demi-god from imprisonment. So they did. The Kototh forces took the statue that contained Decapath and put it on one of their strongest altars to be protected by Gorgons. The Ahuras took the Eye of Decapath and put it in one of their temples under guard of a Law Dragon (but when he died, a Mushrussu took over the job), and the Elves found the only tome telling how to control the Demi-god and placed it under heavy magic wards (but the wizard Idumoon later surpassed those wards and took it upon himself to guard the tome). Ever since his imprisonment Decapath has raged within his shell and awaits the next fool to free him. Without the tome telling how to control Decapath no one has even tried to free Decapath for it seems that only a few are capable of controlling the great beast. Not even the beings of Chaos have enough power to fully control the maddened Demi-god. And so it has remained for milleniums.
Three Quests for Curses Character Stats
(R) The following is a list of stats for all the MAIN characters that will probably be encountered by the players during the course of the adventure. They are listed in alphabetical order.
| DECAPATH, Demi-God of Destruction | |||||||||||
|---|---|---|---|---|---|---|---|---|---|---|---|
| HPV | 140 | OCV | 45 | DCV | 4 | NWI | —8 | S | 160(+6) | St | 80(+4) |
| D | 4(-1) | A | 1(-1) | MR | 6 | NAV | 8 | MDV | 35 | EnL | 220 |
| CDF | 24 | CL | 4 | DTV | —0* | HC | NA | INT | 1 | SS | NA |
| * When he is defeated he automatically is imprisoned in a stone casing. | |||||||||||
APPEARANCE - Decapath has the appearance of a black wingless dragon but with only one eye. His body is over a hundred feet long and twenty feet wide. He walks on all fours. Besides his four huge legs he has six massive arms (three to a side) that he uses to fight foes, or more rarely, for more momentum when he walks. Decapath also has a huge spiked tail that he uses to crush buildings and sometimes people. Whenever all the needed hit points are inflicted upon his immortal body he is defeated. Any type of spell or weapon (even non-magical ones) can inflict this damage on him and it does not matter how many turns it takes to amass this amount. When all his hit points are inflicted on him to cause his defeat he will undergo a change. His body will shrink to a size of a mere dog and his single eye will turn into a large flawless ruby and will drop to the ground. When this happens his shrunken body will be encased in stone.
SPECIAL - Decapath is surrounded by a noxious cloud of poison as specified for a Wyrm, but this power is a weaker form and only drains 1D10 energy points (StB and CB help). Decapath did not, however, inherit the Wyrm's ability to breathe poison (thank goodness for small favors!) He has the ability to cast MEL 20/EL7 destruction as a spell. He prefers to use destruction as a ranged attack and only when around lots of buildings or enemies. Otherwise he will fight normally at all times because he can inflict greater damage.
| GORGITH, Cursed Gorgon | |||||||||||
|---|---|---|---|---|---|---|---|---|---|---|---|
| HPV | 15 | OCV | 5 | DCV | 3 | NWI | 0 | S | 16(+1) | St | 22(+1) |
| D | 8 | A | 10 | MR | 15 | NAV | 1 | MDV | 7 | EnL | 35 |
| CDF | 6 | CL | NA | DTV | —3* | HC | NA | INT | 6 | SS | NA |
APPEARANCE - A female with serpents for hair. Hideously warped and mangled face. Her eyes glow with petrifying intensity.
SPECIAL - Any character that looks at her will be affected by MEL 8/EL5 PERMANENT petrification. The chance for a victim to avoid looking at her equals his WILL or WILL x 2 depending upon the circumstances. She can be slain by any weapon. Her head retains MEL4/EL 3 petrification AS THE SPELL when she is killed. When killed there is a 40% chance that a Pegasi will be born from her blood.
| IDUMOON, Balance Wizard | |||||||||||
|---|---|---|---|---|---|---|---|---|---|---|---|
| HPV | 24 | OCV | 7 | DCV | 9 | CEL | 5 | S | 16(+1) | St | 20(+1) |
| D | 36(+2) | A | 36(+2) | C | 60(+3) | I | 84 | W | 80 | E | 40 |
| Em | 30 | Ap | 27 | MR | 12 | MDV | 30 | EnL | 140 | CDF | 13 |
| MEL | 20 | Casting Ability | 220 | ||||||||
| Height | 68" | Weight | 163 lbs | Age | 60 | ||||||
Expertise - Trained wizard, EL9 General Skills and all Balance powers, EL7 in all Elder powers, EL80 Zehanese, EL60 Ahuric, Corruptic, and Ma'Hales, EL50 Kotothin, the primal, and Elder, EL10 Plains Survival, EL5 Badlands Survival and City Survival, EL6 War Staff, EL80 Armorer, EL50 Jeweler, EL30 Healer, EL60 Disguise Artist.
Equipment - Cowl (I), belt, sandles, leather helm. EL8 Magic Banded Ring Armor with EL5 immunity to Law AND Chaos Powers, EL9 Magic War Staff modified for hit chance and damage plus. The staff is booby trapped so that if anyone, except for a Balance oriented character, touches it he will be affected by EL9 Astral Ills.
Idumoon's magic powers are only second to Nilgeranthribs (that is to say, of all the magic-users in the near vicinity, for in far away lands there are definitely some others that are more powerful). Unlike Nilgeranthrib, however, he is very wary and almost never underestimates his foes and he never makes a rash move. He only causes harm to those that seek to totally unbalance the powers of Law and Chaos in some way. Otherwise he prefers to use unharmful spells on his foes. He only uses his staff when his powers have no effect upon foes or when his energy level is low. He usually gives a foe a second chance to reconsider his choice of fighting a powerful wizard such as he. But Idumoon will then extend his powers to the fullest if his foe unwisely persists in his efforts and if the foe ignores Idumoon's warnings.
| SCALLICK, Mushrussu Guardian | |||||||||||
|---|---|---|---|---|---|---|---|---|---|---|---|
| HPV | 55 | OCV | 15 | DCV | 5 | NWI | —5 | S | 70(+3) | St | 61(+3) |
| D15 | A10 | MR | 16 | NAV | 3 | MDV | 15 | EnL | 71 | ||
| CDF | 9 | CL | NA | DTV | —5* | HC | 55% | INT | 5 | SS | Diurnal Carnivore |
APPEARANCE - Due to his age his green scaled body is slightly duller than for the normal Mushrussu. He has a massive set of lion paws with claws of white gold. The white fire that burns in his eyes is slightly hazed and ancient looking. He is over fifteen feet long and three feet at the shoulder. Three Fire Snakes have affixed themselves to him and Scallick uses them as guards and hunters. These Fire Snakes have currently laid a clutch of eggs in the temple.
SPECIAL - Scallick automatically attacks anyone aligned with Chaos. he uses MEL6/EL3 Fire Darts as a breath weapon. He may be influenced not to do anything other than let someone come and go from the temple unharmed. However, this occurs only when the visitor does not harm the temple or take anything from the temple.
| SEROTH, Chaos wizard | |||||||||||
|---|---|---|---|---|---|---|---|---|---|---|---|
| HPV | 22 | OCV | 7 | DCV | 8 | CEL | 5 | S | 22(+1) | St | 19(+1) |
| D | 32(+2) | A | 22(+1) | C | 44(+2) | I | 80 | W | 70 | E | 20 |
| Em | 35 | Ap | 18 | MR | 11 | MDV | 26 | EnL | 114 | CDF | 10 |
| MEL | 13 | Casting Ability | 133 | ||||||||
| Height | 71" | Weight | 153 lbs | Age | 45 | ||||||
Expertise - Trained wizard, EL8 General skills, EL6 in all Chaos spells, EL80 Rogizinian, EL50 Ro'Babzan. The Abyss, Darkness, Death, and Young Chaos, EL80 Read and Write in Rogizinian, Ro'Babzen, and Dead, EL 12Plains Survival, EL9 Underground I Survival and City Survival, EL5 Mace, EL50 Armorer, EL50 jeweler, EL4 Hand-to-Hand Combat, EL80 Deftness, EL10 Executioner, EL30 Money Lender
Equipment - Jerkin, cloak, pants, boots, leather helm, EL8 Magic Chainmail Armor with MEL8 immunity to Law Powers, EL8 Magic Mace modified for hit chance only. But it also stores 20 points of raw mana that any magic user can use.
Seroth is a very powerful magic user. Probably one of the twelve strongest magic users in the region. He is a cruel person but has a great sense of (DARK) humor. He is not quite as evil as most Chaos oriented beings and often only punishes his victims. His preference is to cast terrible curses upon his foes and/or play dark jokes upon them. However, he never hesitates to kill.
The Quest Items
(R) There are three items that the players will set out to retrieve. If successful in retrieving the items they will bring them back to Seroth in hopes of getting their individual curses lifted. Each item plays a part in freeing and controlling Decapath. The following information is for the ref's eyes only, unless he feels the characters should learn parts of it or unless the module states it is to be read to the player at a later point in the adventure.
The Statue of Decapath
After the defeat of Decapath, in the dawning of Mankind, he was encased in stone and shrunk to the size of a dog. In all respects this statue looks like a normal statue, save for a few things. First, the statue's single indentation, where the eye should be, is empty. Second, the statue is warm to the touch because of the life imprisoned within. Finally, the smoothness and detail of the statue is so realistic it would take the BEST of sculptors to make one like it. When the Eye of Decapath is replaced he will rise again and wreak destruction upon the middle world. However, the worst of scenarios would be if an evil person gained control of Decapath through the use of the Tome of Decapath thus through Decapath's strengths unbalancing the powers, possibly forever. Then the only salvation would be the regrouping of all the great powers to defeat Decapath again.
The Eye of Decapath
As has been said before when Decapath was defeated his eye turned into a large flawless ruby and fell to the ground. The ruby has been treated as if it were enhanced although it was not.
The Tome of Decapath
The only known scripture on how to control Decapath. The tome is NOT needed by supernatural chaos beings (those that have a CL). But if anyone else, including non-supernatural chaos beings, ever crosses Decapath's path without the tome to control him, that being would be attacked until dead. The powers of the tome are: It teaches Destruction, Disintegration and Withering Hand spells up to EL10. It also teaches how to summon and control the Alal at EL10. Additionally, it tells how to control Decapath but there are countless limitations to this and they are explained here.
This is NOT a spell that can be learned. It must be read directly from the pages of the tome and is automatically forgotten once read. In other words, to perform it a second time you still need the tome. You must subtract TWENTY from your chance to succeed and it is treated as an EL5 spell for COST and SPEED only. It is not subtracted from your chance to succeed. Any failure is treated as abysmal and Decapath will automatically turn on the user. The book may only be opened and read by a CHAOS magic user with a MEL of 10 or above. If someone aligned with Law touches the tome he is affected by EL10 Disintegraton. If the person aligned with Law lives through that he is free to take the tome wherever he wishes. However, if the spell is dispelled a Law oriented person can never open the tome himself.
Adventure Section One
The Settling
(P) The players have been in the country of Ro'Babza for some time now. Ro'Babza is one of the few countries that are currently neutral in world affairs. The only problem with being a neutral country is that at any moment it could turn to Chaos OR Law. Currently Ro'Babza is almost trouble free, the only real problem being the constant pirate raids on its commercial boats. The legal system in current use is a judiciary made up of the various nobles in each sect of the country. Criminal cases are presented to them in the best possible manner and then the felon is judged. The minimum penalty is a lOCC fine (which fine can go all the way up to 100GC) and the maximum penalty is death by Guillotine. Additionally, if someone is fined more than 20GC his left hand is amputated and if he is ever convicted of another crime resulting in a fine of 10GC, or more, he is killed by guillotine. Well kept records prevent anyone ever being killed for missing a left hand from other causes.
The Ambush
(R) The following encounter occurs the minute you wish it to occur. But it must only occur while the characters are walking about the city. Seroth, an evil wizard that owns a castle ten miles from the city, has heard of the legendary players that have appeared in K'Lza'Babwe. Seroth has devised a plan that will involve only the very experienced players. He plans to use them to gather the items needed to bring Decapath back to life, however Seroth knows that the players will not help him unless forced to do so. Consequentially, he has hired a dozen assassins to ambush, knock out and bring the characters to his castle where he will find a way to make each do his bidding.
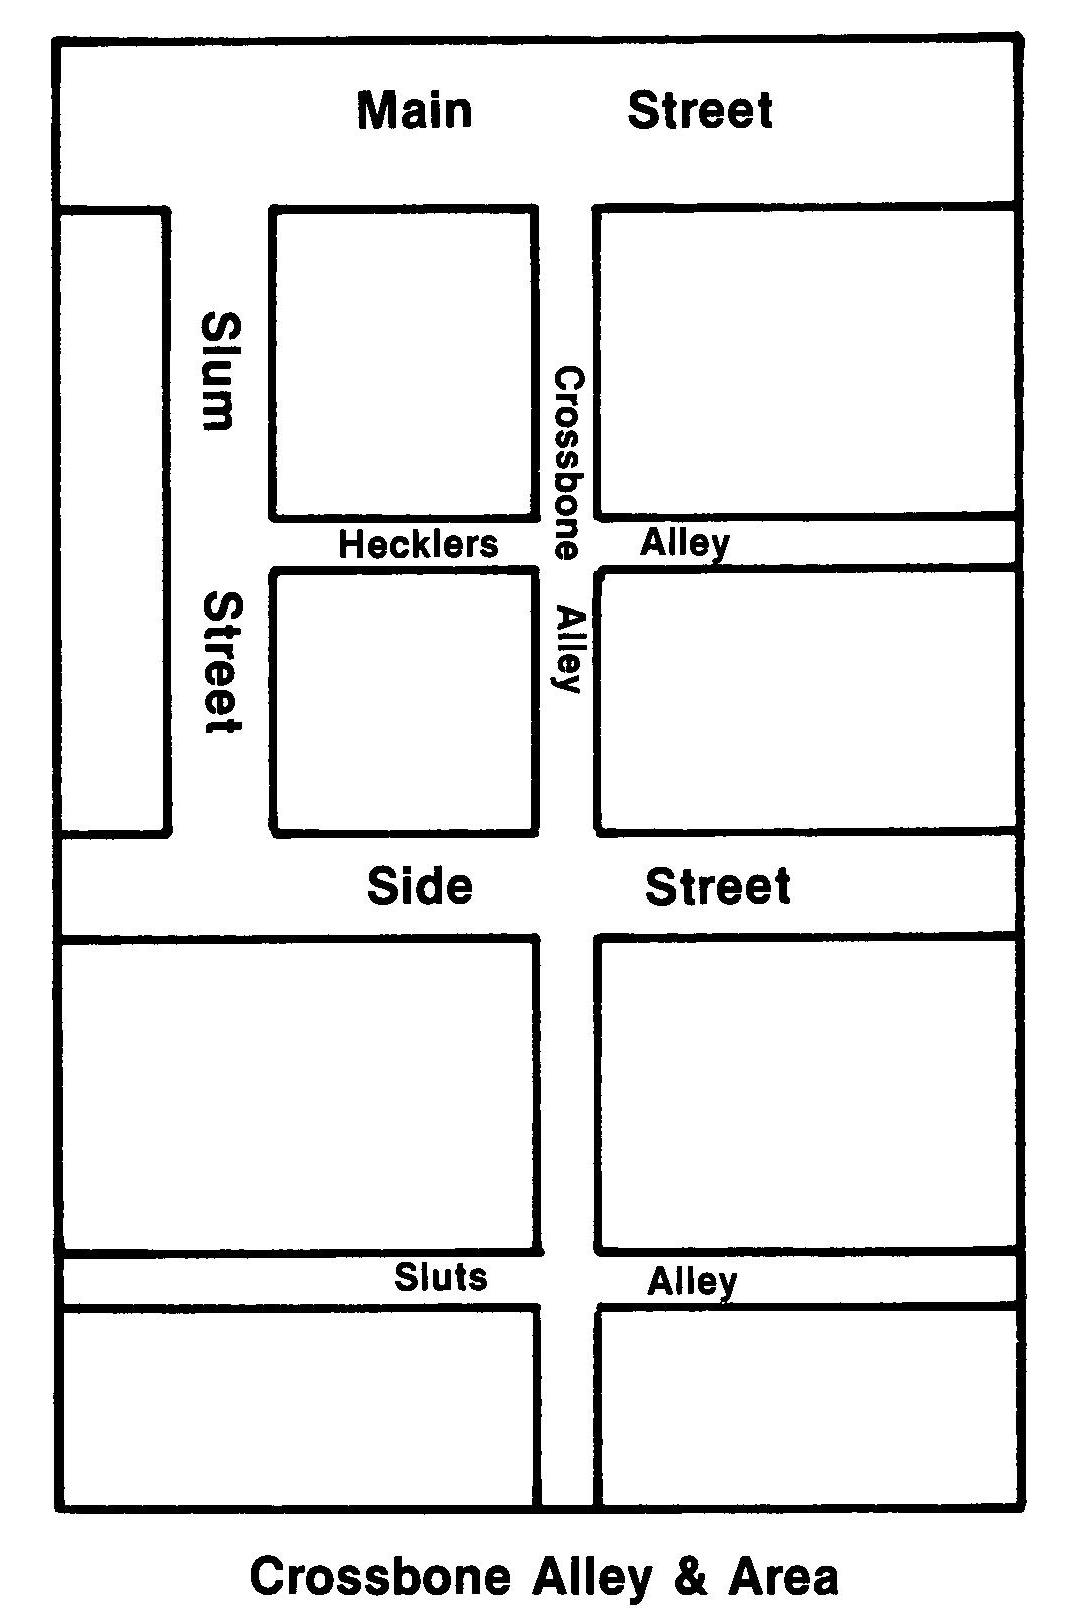
(P) You are walking about the city on your way towards your destination when you come to Crossbone Alley and you turn off. Doors line both sides of the alley and the buildings are so close together that, if you wished, you could barely squeeze between them. Lanterns hang randomly along the alley to give it a bare amount of light.
(R) Seroth's twelve hired assassins lay in ambush for the characters. They are hidden between the building gaps (see the map). They have the following stats:
| AHP | 20 | OCV | 9 | DCV | 9 | NWI | 0* | CEL | 6 | ||
| S | 18(+1) | ST | 16(+1) | D | 21(+1) | A | 32(+2) | MR | 12 | ||
| NAV | 0 | MDV | 6 | EnL | 45 | CDF | 2 | DTV | –2 | ||
| *They have an NWI of 0 because they have hand-to-hand skill. | |||||||||||
SPECIAL - They are EL3 assassins (-3 on hit rolls, -6 on ambushes, -9 on trailing and hiding, +1 on OCV and weapon EL's), EL4 in the use of Heavy Crossbows and Scimitar, EL4 Hand-to-Hand Combat, EL3 subdual Mace, EL36 Trailing, EL1 swimming EL5 City Survival, EL4 Climbing, EL1 Rhetoric, and EL80 Bracket language.
Equipment - All are armored in chainmail and metal helm. They carry heavy crossbow, quiver with 16 quarrels, and subdual mace (made especially for knocking out victims).
They have STRICT orders not to kill the players. If all the assassins are killed by the characters before they are put unconscious, bring in reinforcements (ten assassins at a time) for up to two times until the characters are beaten. If that does not do it tell the players that their characters are too powerful and that any of the characters left conscious are out of the game because they are WAY too powerful for this game. Continue the module with the characters who are rendered unconscious.
Waking Up
(R) After the players are defeated by the assassins in the alley they are taken (drugged and unconscious) to the castle of Seroth and the group is placed in one of his dungeon cells. No matter what you rolled to prescribe the length of time the character is to be rendered unconscious, all characters will awaken one hour after they are placed in the dungeon cell. This is due to the type of drug administered by the assassins.
(P) You awake with your vision blurred and your head spinning ... Immediately you wonder where you are. The only thing you remember happening before losing consciousness is the wicked blow you received to the back of your now-throbbing head as you were walking down Crossbone Alley.
Well, one thing is for sure. You are now in a dark cell with no furnishings. The barest of light flickers in through a small barred hole in the door. This hole is only eight inches in diameter so don't get any ideas of escape. The heavy iron door is barred from the outside and is made of the sturdiest of metal. In desperation you give up your inspection and sit down on the earthen floor to plan your actions. All the while a foul odor fills your lungs, threatening to overcome you with nausea.
A few minutes later the bar to the cell clanks and the heavy door opens. Instinctively you reach for your weapons, soon realizing that you no longer have them. Grimly you wait for your captors to enter. You are surprised to see who walks through. Seroth! You eye him suspiciously as he nears you, recognizing an evil wizard and the scourge of the land. All thought of escape soon diminishes from you mind as you look past him and see a dozen guards barring the exit. Unwillingly you relax and await the now smiling Seroth to explain what is going on.
"Hellooooo gentlemen ..." he says slyly. "I do hope you find our little accomodations to your liking. However, if not, I have a proposition that may take you out of here and into the land of the living." He steps a little closer, his eyes glowing and an evil grin upon his face. "You will go on a quest for me! I want you to collect three items I need for personal reasons."
Before you can tell him to forget it and all those neat words that go with it, he rushes on with what he has to say. "You will do this OR you can rot down here for the rest of your lives. If that seems acceptable to you, remember that you have been cursed as well so if you don't do as I ask, that curse will start affecting you immediately. However, I will tell you more about that little detail in a while."
Unwillingly you agree to his terms but ask for more information about these "quests" and "curses" he is talking about. Thinking all the while about how you will be able to escape once the quest begins.
Upon your request for this information he tells you to follow him into a better room so you and he can talk about these things in a more comfortable manner.
(R) No maps are supplied for the interior of Seroth's castle because the players will NOT be doing any kind of adventuring there. At least no adventuring is planned there unless something strange happens and if it does you should use your own discretion. Seroth will take the players upstairs and into a large throne room where they all sit down to talk things out. Upon arriving at this conclusion, go directly to THE CURSES AND QUESTS sub-section (found directly after this section).
The Curses and Quests
(R) Once the players are in the room with Seroth, together with two precautionary guards, read the player description below: As you probably know Seroth is planning to use the characters to go on a quest to gain the items needed to control Decapath. He has used curses on the players to get what he wants since he knew they would not willingly cooperate in his scheme otherwise. For this reason NO Law wizards and/or those who can lift curses are allowed on this adventure. All the players have a curse and they all have the same effects listed below:
They are under a geas. They must collect all the items needed to free and control Decapath. Failure to do so or a decision not to cooperate and they will be affected by the curse. The curse is: The player will be transformed into a hideous looking creature (ZERO appearance but all other abilities remain the same) and he will be plagued with bad luck. He will add 16 to all rolls in his favor and all hits scored against him will be one level lower (Example: A Severe becomes a Deadly Hit).
(P) Once you are seated in the room with Seroth he begins to explain what is going on.
"Well, my friends, this is the story. I need three items for personal reasons, as I've already stated, and I need you to obtain them for me since you are some of the best warriors/sorcerers/or what-have-you in the area. Actually, you have NO choice as to whether or not you want to do this for me. I have placed a curse upon each of you, the curse is actually quite harmless UNLESS you defy me! If you defy me the curse will transform your body into a hideous thing and you will be plagued by bad luck for the remainder of your life. So, as you can see, you ARE going to do as I wish ...." Seroth leans back into his chair and lights his pipe.
"The quest is as follows: First, you must travel south to the Shrine of Gorgons. You will find a small statue placed on the shrine. The statue has six arms and resembles a Wyrm. You must steal it. Secondly, you must travel to the southeast until you come to the Temple of Prezivor. Within the temple you must find a large and flawless ruby which is guarded by Scallick, a Mushrussu. Lastly, you must travel to the northeast of the temple until you reach the Tower of Idumoon. In the uppermost room of the tower you will find a tome labelled The Tome of Decapath. You must take the small statue, the large and flawless ruby and The Tome of Decapath and proceed northeast until you reach the Hill of Magic where I shall be waiting. Then and only then the curse will be lifted and you shall be free to go."
You look at Seroth dumb-founded. You cannot believe what you have just heard. Cursed Shrines-Temples-Towers-Wizards-Monsters-HEY! Wait a minute, how does he expect Y-O-U to do all this?! Too bad you don't have some Law oriented wizard to lift your curses ...
To soothe your worries, Seroth says: "Oh, don't worry my patrons. I am not all bad. I plan to give you a fair chance to succeed. After all I do depend on your abilities for reasons of my own and I plan to give you as much of a fighting chance as I can."
DON'T WORRY he says! You would like to crack his head open and give HIM something to worry about. Suddenly Seroth claps his hands and his guards appear in the room carrying equipment. Mostly your own equipment!
Seroth hands you all the equipment you formerly carried and you quickly put it on. Then you look at him strangely for it appears he carries some OTHER equipment. Stuff that doesn't belong to you.
"Here are some magic items that are sure to help you on your quest. Feel free to ask what each does ..."
(R) The following is a list of the magic items and what they do. You should answer all questions asked about these items as the player wishes. One player (the BEST fighter of the group) receives a magic weapon of the type he most prefers (all by coincidence, of course) that is modified for hit chance, damage plus, and which is dedicated to destroying Gorgons.
A magic talisman, for use by any magic user, which stores 30 points of raw mana and which can cast Healing at EL4.
A magic metal helm that is modified for AV and which can cast Stillness at EL4.
A magic suit of chainmail modified for AV and ensorcelled with EL4 immunity to Fire Powers.
A suit of magic leather armor modified for AV and ensorcelled with EL4 Detections and Dispell/Banish.
A magic metal shield modified for AV and which can cast EL4 Destruction.
ALL the above items are MEL13/EL8 items. Almost all of these items were created by Seroth. Each player can choose ONE item from the above list (ONE ONLY!) and if any are left over, they are kept by Seroth. Basically, there is at least one item for each type of character (fighter, magic user, assassin, thief, etc.)
Besides the above magic items, the characters also receive a small wagon pulled by two draft horses with a skilled driver to control it. The wagon will carry the characters where they want to go, and fast! It will carry all equipment as well, if they wish. It will NOT, however, be allowed to participate in combat for fear of it being destroyed, equipment stolen and/or the driver killed. Instead, the wagon will stay hidden nearby while the players retrieve each of the items needed and then it will take them on to the next place.
On Your Way
(P) After talking with Seroth you have decided you have no choice but to agree to his terms. Upon reflection you figure you even have a good chance of succeeding at the quest.
Seroth escorts you through the castle gates where the small wagon and driver await your arrival. Seroth has warned you that the easiest way to complete the adventure is to take the most direct routes and to go to the Shrine first, temple second, tower third and the hill last. He wishes you good luck and waves fairwell to you ... and you are under way.
Adventure Section Two
The First Quest
(R) The first quest is to find and take the Statue of Decapath from the Shrine of Gorgons. This shrine is found ten miles north of the Sabai tribal center (in the country of Shurikal). The shortest and most direct route from the Castle of Seroth to the shrine would cover 150 miles through mostly plains terrain. This is one of the three small quests that make up the ultimate quest of freeing Decapath. For encounters in the country of Shurikal subtract TEN from the appropriate encounter table and if the result is ZERO or less 1D10 below:
| DAY | NIGHT | ||
|---|---|---|---|
| ROLL | CREATURE | ROLL | CREATURE |
| 1-2 | Giant, Storm | 1-3 | Giant, Storm |
| 3-5 | Earth Eater | 4-7 | Dae'Ta Koti |
| 6-9 | Dae'Ta Koti | 8-9 | Ogre |
| 10 | No Encounter | 10 | Giant, Earth |
In the country of Shurikal you are aligned with Kototh or you're probably in for trouble. It is one of the most civilized areas of the middle world under Kototh's influence. The normal type of human encountered will be aligned with the Kototh side of Elder.
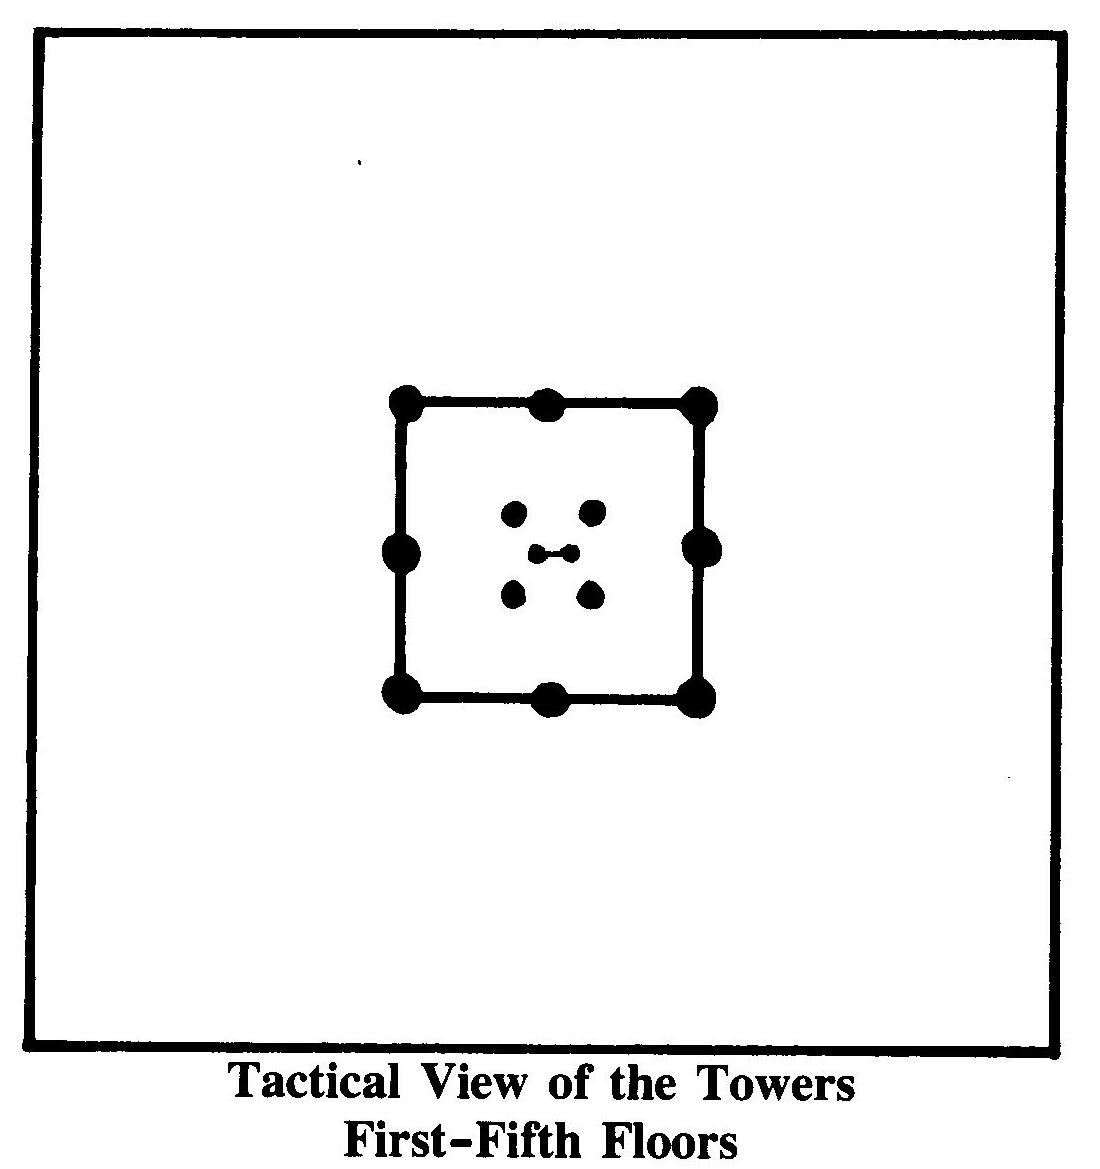
The Shrine
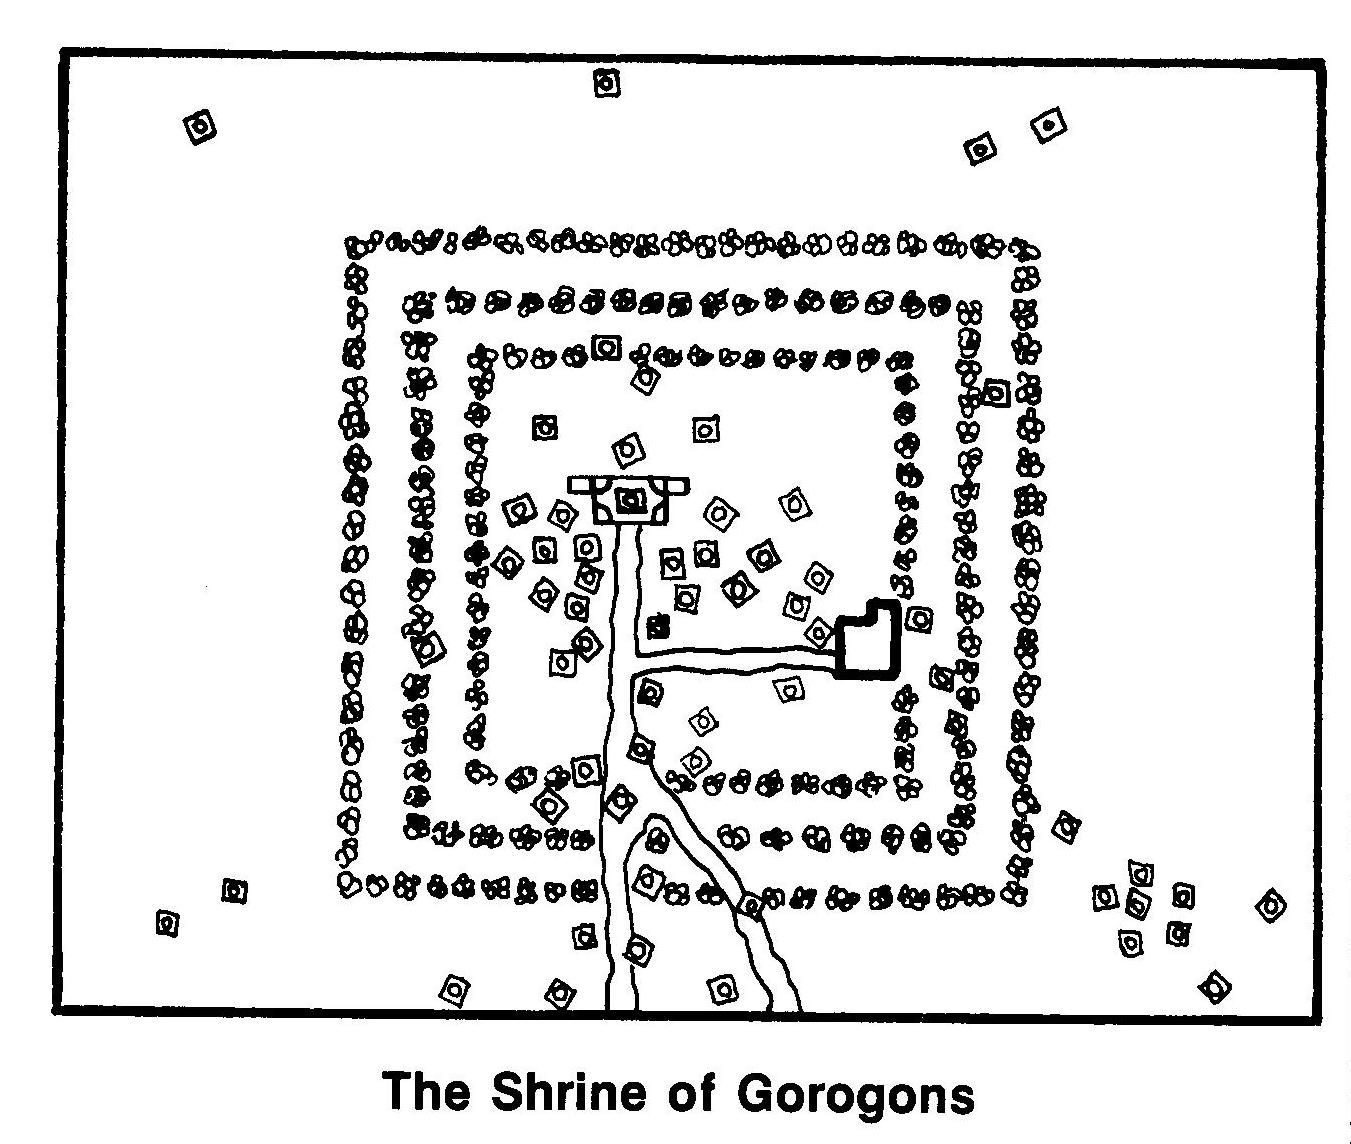
(P) After a long and grueling journey your small party calls a halt and off in the distance you finally see what you are searching for. The shrine! It lies in the center of a shallow valley, upon which rim you are staning upon right now. A single road winds down the valley leading to the shrine entrance. From your vantage point you see the road leads into an orchard of well kept, but ugly, black trees. Two structures are seen in the center of the orchard. One is a large outdoor altar and the other is a small one story building probably used only for the meetings by worshippers of Kototh.
(R) There are THREE guardians of the shrine. All are Gorgons and one is a sighted Gorgon. See the module stats for the sighted Gorgon (Gorgith) but for other Gorgons use the standard stats of book three. One normal Gorgon is ALWAYS within twenty hexes of the altar. The other sightless Gorgon is ALWAYS somewhere in the orchard to tend to the trees and in search of intruders. Gorgith can be found almost anywhere. To find out where she is when the players enter the area roll 1D10 below:
| GORGITH ENCOUNTER TABLE | |
|---|---|
| ROLL | LOCATION |
| 1 | Somewhere between the outermost rows of the orchard. |
| 2 | Somewhere between the innermost rows of the orchard. |
| 3-5 | In one of the rooms inside the side building. |
| 6-10 | Next to the outdoor altar. |
To determine where she is EXACTLY among these general areas is up to the ref, as it is for the normal Gorgons.
ANY loud noises in the area will draw the attention of any Grogon within FIVE HUNDRED feet of the noise maker. It is possible for the players to ambush the Gorgons but it is NOT possible for the Gorgons to ambush the players except in the following case–If a nearby Gorgon heard a noise and then advances to investigate, roll for an ambush on HER part NOT the players.
Finally, there are three AREA DESCRIPTIONS written and explained next.
The Altar
(P) You finally reach the altar in the center of the clearing. The altar is a large stone slab 20' by 12' and it has strange carvings all over it. The weird looking statue you are supposed to seize is seated upon the altar. As Seroth described, it is the most weird looking thing you have ever seen. It has six arms, three to a side, four legs, and a body and head resembling a Wyrm. Scattered all around the altar are many statues, past victims of the Gorgons. Each is twisted into individual horrified positions and many are crumbling away. You spot two chests, one to either side of the altar. Each chest is locked and each appears to be of tough construction.
(R) Don't forget the Gorgon that always guards this spot!
Seated upon the altar is the statue of Decapath and it has the following values – Small, made of stone, weight 16 pounds, and can be sold for up to 20SC in a Chaos culture.
The two chests are full of treasures that worshippers sacrificed to the shrine (for good crops, wishes, etc.) and they are described below: The left chest is made of aged wood and is locked with an EL40 lock. This chest holds all the lesser treasure (from peasants). It holds 50BB, 50CC, 3 small jewels and 5 normal weapons. The chest on the right is made of wood but it has an EL70 lock instead. It holds all the richer treasures (from nobles). It holds 1 copper bar, 20GC, 40SC, 4 large jewels, 5 medium jewels and two random magic items.
Area 1 of the side building
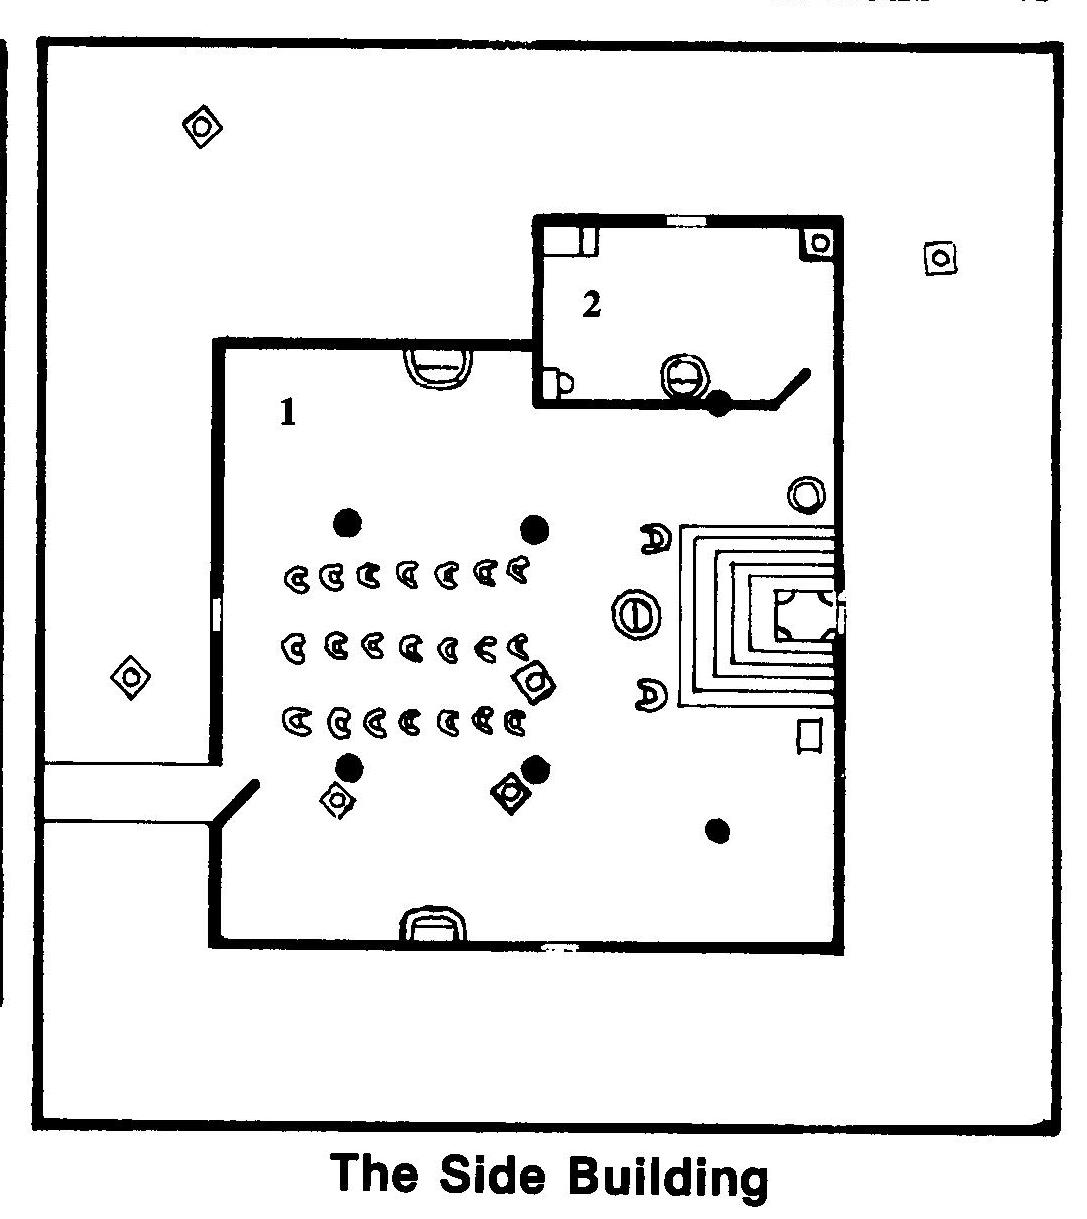
(P) This is a huge meeting hall probably used by worshippers for rituals, lectures, and sermons. The roof is supported by six pillars and it rises to the height of fifteen feet. Three rows of chairs sit in the middle of the room in neat looking lines. Three hearths are strategically placed about the area in order to give the hall the most heat possible. These hearths are always lit and their flames cast eerie shadows about the hall. A few more victims of the Gorgons are seen in here also. Against the east wall is a raised platform with stairs leading up to its top and upon which sits a small altar. To either side of the platform is found a wooden barrel and a chest. Finally, to the northeast, there is a wooden door leading to another room beyond.
(R) The room is normal. The barrel next to the platform contains (religious) fine wine and the chest contains robes.
Area 2 of the side building
(P) This is a large room with only a few items in it. A wood frame bed lies in the northwest corner. In that same corner sits a normal statue, not a victim of the Gorgons. A desk and chair sit in the southwest corner and just to the east of the desk is a small hearth with a bright fire burning within.
(R) All is as stated above. Inside the desk can be found a small jar that contains an enhanced Lapwing heart.
Conclusion
(P) You succeeded! There are now only two remaining quests to complete before you are home free.
You quickly load the statue which you stole from the shrine onto your small wagon and shout to the driver to go! With a crack of the whip the wagon jolts forward and off you go to the temple of Prezivor.
Adventure Section Three
The second Quest
(R) The second quest is to find and take the jeweled Eye of Decapath from the temple of Prezivor. This temple is found 5 hexes (100 miles) southeast of the Sabai tribal center OR 6 hexes (120 miles) from the shrine of Gorgons. The quickest and most probable route to take is to just cut straight across the land in this exact direction. For encounters in the land of Shurikal subtract TEN from your rolls and if the result is ZERO or less, roll 1D10 on the table given for the 1st quest (the shrine)
The Temple
(P) Your party calls a halt after a long second phase of your journey from the Shrine of the Gorgons. At the top of a small hill, up ahead, you see the temple you are searching for. The hill is very steep, at least on most of its sides, and it is covered with the thick dense growth of plains' grass. The temple itself is not very large. However it is made up of three levels. The building appears to be very old and in a state of disrepair. It looks as though no one ever comes here any more.
(R) There are four guardians of the temple. One is the Mushrussu Scallick, and the other three are the Fire Snakes that are affixed to his body. One Fire Snake is a double sized female and the others are two normal sized males. The female is ALWAYS encountered on her nest (which is in AREA 2 on the altar) and she guards it and that area from intruders at all times UNLESS Scallick tells her to do otherwise. One of the males is on guard in AREA 1 at all times. This male will hiss at anyone who enters. He continues hissing until the intruder leaves OR until the intruder stands still and asks for Scallick. If the intruder is not smart enough to leave or ask for Scallick, the Fire Snake will attack. If the intruder requests Scallick, the Mushrussu will become aware of this through telepathy from the Fire Snake and Scallick will then come to AREA 1 via AREA 2 and ask what the intruder wants. The third Fire Snake is either hunting for food (50% chance) or he is in AREA 2 with the female together with his day's catch of food. If the third Fire Snake is found on the nest he will react in the same manner as the female.
Area 1 of the Temple
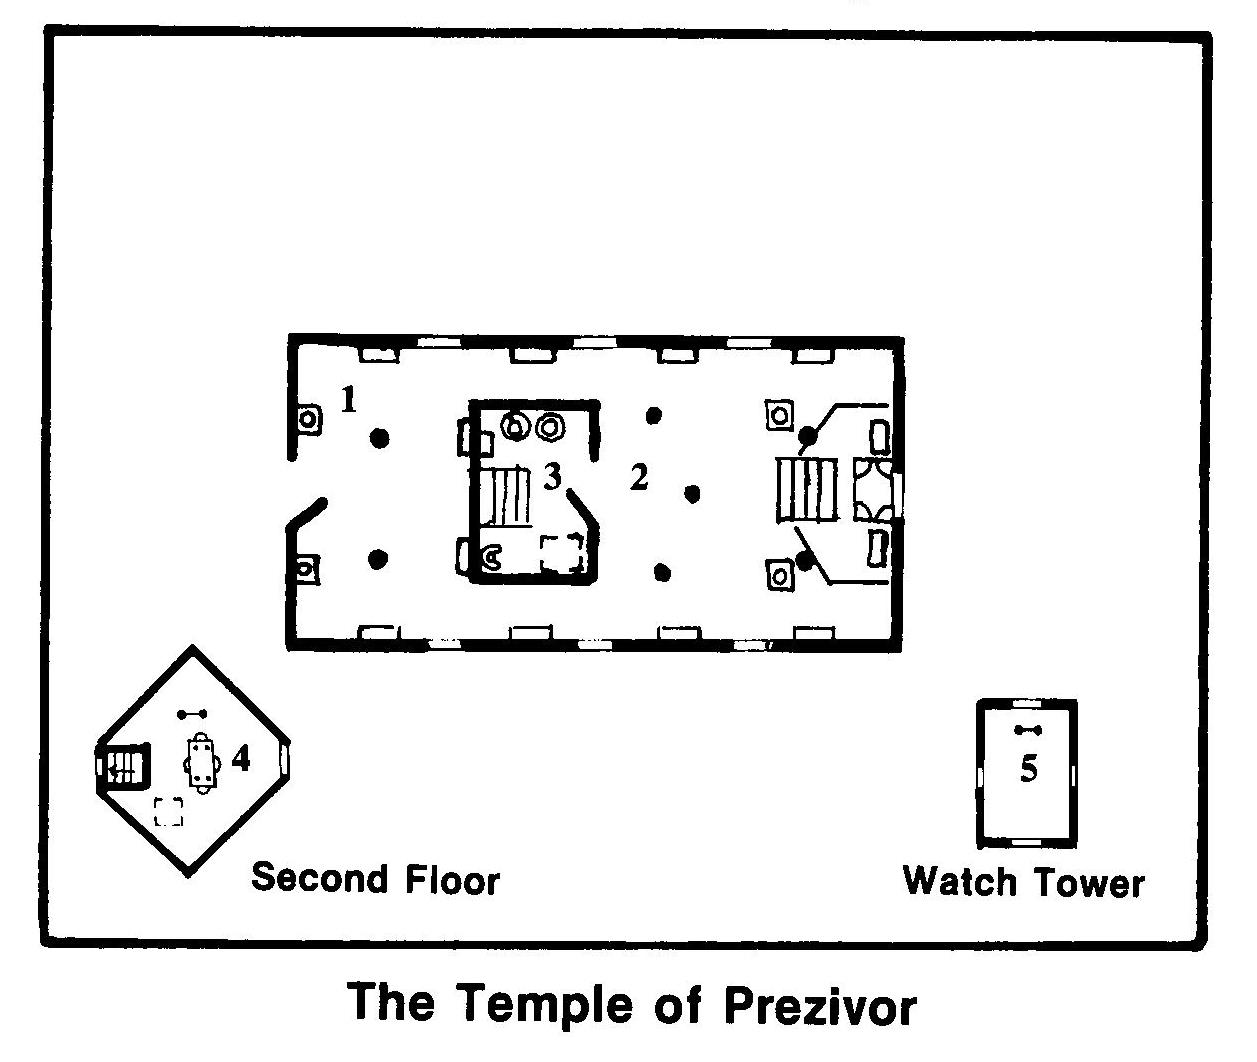
(P) You find yourself in a large room with two pillars supporting its twelve foot high roof. Many exotic pictures of great beauty adorn its walls. There are two statues, one to either side of the door. They sit in solemn silence with glazed eyes staring back at you. A few windows give the room a flood of light.
(R) One Fire Snake is on guard in here at all times. For more info on the Fire Snake see THE TEMPLE sub-section (the one just above this section). Most of the pictures are of good quality and their values can be determined randomly if the players desire any of them.
Area 2 of the Temple
(P) The room you are in is fairly large. Five massive pillars support its roof. A small set of stairs in the eastern end of the room lead up to a raised platform. An altar sits upon this platform as well as two chests. Thealtar is in the shape of the god it is dedicated to (Prezivor). In the outstretched hands of the altar of Prezivor is a large flawless red ruby. The very ruby you are searching for! Other items of note in this room are two statues standing to either side of the staircase leading up to the platform and altar. Both of these statues are in the shape of a Kerubim, the strongest of the Ahura kind. Pictures line the walls and many windows give the area a flood of light.
(R) Remember that Scallick and the female Fire Snake are always in here and in addition one of the male Fire Snakes may also be in here. The Fire Snakes currently have a nest with three eggs in it. This nest is found hidden behind the altar and can be easily searched out. The ruby is, indeed, the ruby the players are seeking and the two chests contain a tidy sum of treasure (see below). The northern chest contains 84SC, 94CC, 5 Large jewels, 15 Medium jewels, one minor spell book, one treasurer scroll, and one random magic treasure. The southern chest contains 10GC, 20SC, 1 copper bar, 1 silver bar, 5 fine metal items, and one random magic item.
Area 3 of the Temple
(P) This is a very small, dusty and grungy store room. It contains two barrels, a small chest in the northern section and a single, old and rickety chair lies in the south end.
(R) There is a hidden trapdoor in the southern end of the room. A successful search for it will reveal a movable plate that proves to be a way to get up to the next highest level.
The barrels contain oil and water, respectively, and the small chest contains some rusty nails.
Area 4 of the Temple
(P) This is some kind of a meeting or convention room. In the middle of the room is a long table lined with chairs on either side. An old half candle sits upon the table. To the north of the table is a rusted ladder that leads up to yet another level of the temple.
(R) A hidden trapdoor can be found on the floor in the south end of the room. If the floor plate is lifted it reveals a drop into AREA 3.
Area 5 of the Temple
(P) This area is totally unimpressive. It is a barren area. The floor is coverd with an inch of dust and there is no sign of any tracks. Windows line the walls, one of which windows is broken.
(R) Nothing of interest is in here unless you wish to liven things up a bit and say that a Wyvern uses the beams of the roof for her nest and the players might possibly disturb her ...
Conclusion
(P) Having gained possession of the ruby, there is only one quest remaining. Which is a good thing because you are tiring of all this mumbo jumbo. Quickly you load up the wagon and continue on to the Tower of Idumoon to gain possession of the Tome of Decapath.
Adventure Section Four
The Third Quest
(R) The third and final quest is to reach the top of the Tower of Idumoon and find the Tome of Decapath. The tower is located 10 miles north of the City Hele (located in the country of Ma'Hales). The quickest way to get there is to cut straight across the river. For encounters in the first (river) hex entered, roll to see if it is a water encounter or a land encounter.
The Tower
(P) Peering through the light fog of the day, your party finally spots what they are searching for. The Tower of Idumoon sits on the top of a small hill. The tower is not very big in diameter but it raises to an astounding height of over EIGHTY feet! The tower sparkles and shines, giving off a strange sense of magic. The whole area is silent of all life forms, as if no one wishes to break the spellbinding sight of this strange tower.
The most astounding thing about the tower is the manner in which access is to be gained. The tower itself does not rest upon the ground. Instead, twelve pillars rise from the ground directly underneath the tower to a height of about fifteen feet where they then connect and support the tower's weight. Each of these pillars is 2' in diameter. Scaling the tower looks impossible since it is straight up and it is over seventy feet before you reach the uppermost level which looks as if it has the only entrance to the interior. There are a number of decks (four) encircling the top of the tower which would definitely give access to the inside. It appears there are no stairs or doors underneath the tower.
(R) There are six guardians of the tower. One is the wizard Idumoon, two are Zehani Wolves that guard the tower exterior and the remaining three are Te'Sla that guard various levels of the interior. All of the guardians are normal types for their species (except the wizard, of course).
The two Zehani Wolves are ALWAYS encountered underneath the tower in the middle of the four centermost pillars. They guard the area from intruders at all times. It is possible to ambush the Zehani Wolves however. If they catch anyone attempting to scale the walls they will try to attack the intruder if they can, otherwise they will bark loudly and alert the others in the tower. If this happens Idumoon will appear on the nearest deck and cast spells down upon the players below. If the players approach the center of the tower openly and pleasantly the wolves will rise (but won't attack) and one will make a howling sound to alert Idumoon of the players' presence. After one turn, Idumoon will appear by the use of a ladder that pulls down to the ground from the first level of the tower and Idumoon will ask the players what they want (he will never give them the tome). If the players attempt to sneak under the tower and find a way up the wolves will attack.
The three Te'Sla that guard the interior of the tower will attack on sight UNLESS the players are with Idumoon. If the players attempt to get away from the Te'Sla by use of the ladder system, the Te'Sla will give chase.
The only safe way into the tower is through its underside. A hidden trapdoor is located at the center and it usually is unlocked. Someone may make it easier for the rest of the characters to enter by lowering a ladder that is found above the trapdoor down to the others (that way they do not have to make climbing rolls and risk injury). However, to get the ladder, someone has to climb.
Areas 1-5 of the Tower
(R) All of these areas have the same appearance except for a few minor things. The dis-similarities are explained below, following the player description (used for all of these areas unless something special happens).
(P) This level of the tower is barren and contains nothing of real interest. The ladder continues on into darkness in both directions.
(R) Each of these levels has something to defend against intruders. Each is explained below.
The first level of the tower has a ladder BUT it does NOT lead down. Instead of going down like it should it comes to an abrupt halt, three feet above the floor of this level. Unknown to the players there is a hidden trapdoor directly below the ladder. If it is lifted from place it will reveal a 3' x 3' hole that can be used to enter and exit the tower. The only problem with this is that it is a fifteen foot drop to the ground below. It IS possible (but unlikely) to climb underneath the tower, crawl upside-down until you reach a nearby pillar and climb down the pillar to the earth below. BUT it is a climbing difficulty of FIVE (nearly impossible. But there is an alternative. If the players search the room's floor very carefully they will find some other floor plates that can be removed and if they are removed a folded up ladder will be revealed. The ladder can be made to extend to a total length of twenty feet. The players can use the ladder to gain access or possibly exit easily. There is one of Idumoon's trained Te'Sla guards in here. The trained guard will attack ALL intruders UNLESS they are accompanied by Idumoon.
The second level has a ward on one of the ladder rungs. If anyone touches it (automatic unless the players skip every other rung on purpose, which means it is a 50% chance of still setting it off) it will set off an MEL20/EL9 Oblivion spell on the person who touched it. If it works, the character is literally out of the game. He will appear in this exact spot after the duration ends and if the rest of the party failed in their quest he will IMMEDIATELY be affected by the curse that Seroth cast upon him and he will not be able to redeem himself. However, if the remaining characters succeed, he will be free to do whatever he wants.
The third level is not a level at all. When the characters first touched the ladder (regardless of whether they were clear down at level one or way up at the highest level) a ward was set off (unless only BALANCE aligned players touched the ladder). If the ward is set off it creates a major illusion. This illusion creates a fake level for the duration specified (after which it disappears). This major illusion creates a whole level that looks EXACTLY like the others with the following sole exception. The characters see a mound of treasure in a far corner of the room/level. This will probably attract the characters into going after it! In so doing they will plummet to their injury and possible death. It is a 25' drop to the level below. It is a MEL20/EL7 spell. Remember that the ward is set off as soon as the ladder is touched at ANY time on ANY level throughout the tower.
The fourth and fifth levels of the tower have one Te'Sla guard each and they will attack the players on sight unless the players are accompanied by Idumoon.
Area 6 of the Tower
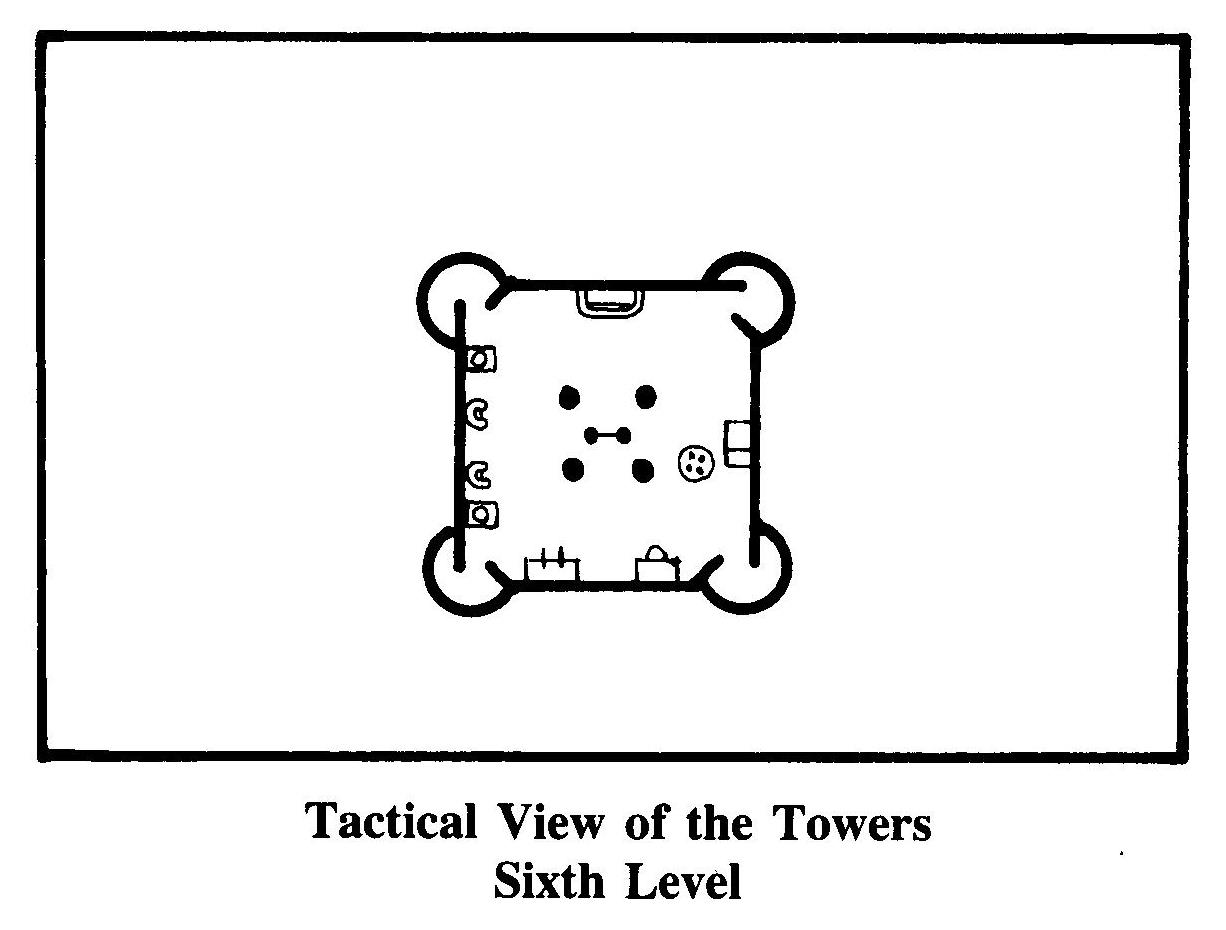
(P) You find yourself at the top of the tower. This level, as well as all the other levels, contains NO windows whatsoever. Instead, a large hearth in the south end of the room burns brightly with its tendrils of light and fire reaching to every part of the room. At each corner of the room is a door which leads outside to a small deck overlooking the surrounding terrain. A bed and table sit in the west end of the room and a desk with a chair sits north of that. A little to the east of the desk is a cabinet. Against the east wall sits two statues in the shape of the fabled Zehani race and between these statues lies two chairs. But you see nothing of the tome you are looking for.
(R) Idumoon is ALWAYS encountered in here (unless the characters already met him at the base of the tower). One of the Zehani statues has a hidden cavity in back of it. Inside the cavity is the Tome of Decapath. The desk contains a small vial with three ounces of a MEL4/EL2 Healing spell potion. The cabinet contains a MEL20/EL2 Healing spell potion. The cabinet contains a MEL20/EL9 magic dagger modified for hit chance only, a bowl containing 20GC and 20 SC, two bars of silver, and a minor spell book which could be mistaken for the tome if the examiner is not a magic user AND does not look closely.
Conclusion
(P) Well, that's that. A bed of roses, right? Well, maybe it wasn't but you are glad to be alive! However, there is one thing left to do. You have to deliver all this junk to your "friend."
Adventure Section Five
The Delivering
(R) The players will have to travel 40 miles northeast of the Tower of Idumoon, not the city of Hele, before they reach the Hill of Magic (where they are supposed to meet Seroth). Use the standard encounter chart for the journey and do NOT subtract anything from the rolls.
The Hill
(P) Ahhhhhh. For the first time in weeks your party is fresh, relaxed and happy. Suddenly your mood changes as you finally sight the Hill of Magic and the scum that stands upon it. You can easily guess that Seroth has already spotted you and that he has a smirk on his face just waiting for you. You also see at least 40 of Seroth's warrior/followers lining the hill. Undoubtedly for Seroth's protection. At the peak of the hill is the famous Altar of Magic which suposedly was used as a great source of Chaos power during the Law-Chaos wars in the year of 1070.
You are beginning to wonder why Seroth wants all this stuff you have collected and why he has asked you to bring it here rather than to his castle.
(R) Seroth and forty-five of his warriors/followers are waiting at the top of the hill for the players. All of the warriors have the following stats:
| AHP | 12 | OCV | 5 | DCV | 5 | NWI | +3 | ||
| S | 15 | St | 12 | D | 12 | A | 12 | MR | 9 |
| NAV | 0 | MDV | 4 | EnL | 37 | CDF | 1 | DTV | -2 |
and as equipment they have banded ring armor, metal helm, buckler, light crossbow, 12 quarrels, and sword. They are EL2 in the use of all weapons and the buckler.
As soon as the players are on the hill and ready to give the items that they collected to Seroth, go immediately to the PROPOSITION sub-section below. Remember that the curses are NOT lifted until Seroth receives his "gifts".
The Proposition
(P) "Well, my friends, I do see that you have all the items that I want," states Seroth. Then, when you give everything to Seroth he continues to say: "Now that you have totally astonished me by succeeding in your quest I believe I have a use for you. How would you like to join me as the captains of my soon-to-be army?"
"Yes? All right! I now declare you as my captains. Now I will show you what all these things are that you have fetched and presented to me, and what they can do." After saying all that, Seroth and three of his warriors pick up the items you have him and carry them over to the altar which lies a hundred feet from where you stand.
"No? That is too bad. I really wished you would join my forces. I could use leaders such as you. Well, I do hope you will stay for the show. Just so you can see what all these things do." After saying all that Seroth and three of his warriors pick up the items you gave him and walk over to the altar which lies a hundred feet away.
(R) If the characters attack Seroth's warriors and/or Seroth, the warriors will attack the players. These warriors stand between the players and the altar and they will try to keep the players from passing. Meanwhile (while the characters are fighting) read the player description of THE BREACH sub-section (Adventure section six).
If the players do not attack because they have accepted Seroth's deal or because they do not feel up to it, read the same thing as stated above. In other words no matter what happens go directly to ADVENTURE SECTION SIX and read the player description for THE BREACH.
Adventure Section Six
The Summoning of Decapath
(R) This sub-section occurs after the numerous possibilities take place that could have occurred in ADVENTURE SECTION FIVE. It involves the attempt (that fails) by Seroth to control Decapath after Decapath escapes from his imprisonment.
The Breach
(P) When Seroth reaches the altar he orders one of his men to put the statue, which you took from the Shrine of Gorgons, on the altar. After that he pulls the flawless ruby, which you removed from the Temple of Prezivor, out of his pocket and places it carefully in the head of the statue where its single eye should be. Then, finally, Seroth takes the tome from the hands of one of his warriors and holds it before him. When this is done he starts to chant the words imprinted in the tome.
Almost immediately the statue begins to glow with life and the statue's newly found jewel/eye begins to pulsate. Seroth continues to chant the strange words from the tome. Then the statue commences to grow in size! First ten feet, twenty feet, and finally to THIRTY feet high! And over a hundred feet long! You are totally astonished! Suddenly Seroth happens to look up from the tome's pages and when he sees what is in front of him, his voice falters and stops all together. Everyone senses it. Seroth has screwed up! He has lost control of the hideous monster.
Everything goes quiet. The, now huge, statue stands still, the people stare, the wind calms, and everyone holds their collective breath. Then it happens! The huge hundred foot long statue begins to quiver and crack. Then bits of living flesh begin to show from underneath the stone casing. Then it explodes! Out of the stone casing comes a living creature that resembles the formerly small statue in exactitude. From then on everything becomes chaos. Seroth's warriors start to bolt in terror. The huge creature steps on many of them. Seroth strikes the creature with a spell that has no effect other than to make it very angry. The creature steps on Seroth and then it focuses its large single eye upon YOU!
(R) Use the stats given in this module for Decapath. The players are all alone in this battle because all the warriors have run away and will attack until the death. Decapath will destroy everything in his path. When the battle is over read the final player description to the players.
(P) When the final blow is struck, Decapath screams! His body quivers and shakes. Then his skin starts to turn into stone and his body once again begins to shrink into the small harmless statue it formerly was. His eye turns into a large flawless ruby and, once again, it falls to the ground awaiting the next fool to replace it. You search about for Seroth's body but you find it GONE! As is the tome he was using to attempt to gain control of Decapath. It is as if Decapath never was, and as if nothing had ever happened. But one thing is for sure, and that is that for as long as the tome which can control Decapath remains afloat someone will attempt to find it and use it again. Perhaps Seroth …